OpenVPN with global IPv6 addressing
October 28th, 2023, last changes on October 29th, 2023The Goal
- Get a cheap (at max 3€/month) on-demand (save money when off) VPN service (protect device/s when abroad).
- Get a global IPv6 address in IPv4 networks.
The Solution

- The solution will be based on a virtual machine running a VPN gateway: OpenVPN in this case.
- The VM gets a public IPv4 address and a public IPv6 prefix.
- The clients will get private IPv4 addresses that will be NATed and global IPv6 that will be routed to the clients.
- Optionally, the IPv6 addresses may be changed to private ones (fc00::/7 block).
How to setup the environment of Amazon AWS? Scroll down!
UDP vs. TCP
tldr; Hiding the VPN behind TCP 443 makes is reachable from almost everywhere for the price of speed and being continuously scanned vs. hiding it behind a random UDP makes is fast and secure for the price of being blocked by some (many?) public hotspots/networks.
Selection of the port type and number for the OpenVPN server is tricky. There is no one solution that fits all. Taking UDP improves speed and security of your server (UDP port scans are not as easy as with TCP). Taking TCP improves compatibility (as some public hotspots/hotel networks block UDP or may have issues with masquerading returning UDP traffic). Selection of the official OpenVPN port number (1194) maybe supports compatibility, but opens a risk of the server being regularly scanned. Taking some other random port would make it better. On the other hand public networks may block unusual ports and allow only for like 80, 443 and maybe some more.
Fast Approach
There is a helping script OpenVPN road warrior installer published by Nyr that, as the name says, automates installation and configuration of the OpenVPN server on Ubuntu, Debian, AlmaLinux, Rocky Linux, CentOS and Fedora. It downloads necessary packages, installs them, configures iptables, configures OpenVPN service and generates the first client's key. The same script can be called later on to generate additional client profiles (keys) or to revoke existing ones.
It's worth taking a look inside of the script to understand what is happening there:
Checks:
- Running in bash.
- Kernel version and distro type/version for compatibility.
- Root rights.
- Existence of a TUN device.
- Availability of wget or curl. Installs wget if none available.
Lets you configure:
- The public IPv4 address. Calls http://ip1.dynupdate.no-ip.com/ for getting the IP behind a NAT.
- The IPv6 address. It assumes NAT will be needed.
- The protocol type (UDP or TCP) and the port number.
- The DNS servers that will be pushed to clients.
- The name of the first client (other clients can be added later on).
Performs the installation:
- Installs iptables if on Ubuntu or Debian. Installs firewalld if on CentOS or Fedora.
- Handles containerized environments by setting
LimitNPROC=infinityfor the systemd configuration of OpenVPN service. - Installs OpenVPN, OpenSSL, CA-Certificates and tar.
- Installs EasyRSA into
/etc/openvpn/server/easy-rsa/for generating all keys and certificates later on. - Generates CA without password protection.
- Generates server's key without password protection and valid for 3650 days (ca. 10 years).
- Generates client's key without password protection and valid for 3650 days (ca. 10 years).
- Generates an empty CRL valid for 3650 days (ca. 10 years).
- Generates TLS key for the server.
- Copies hardcoded Diffie-Hellman parameters to the server's configuration. This is not a security leak - these parameters are treated as public and specified in RFC 7919 as
ffdhe2048. You may consider generating your own ones if feeling uncomfortable. - Generates server's configuration file. Missing IPv6 address in the checks before skips configuration of IPv6 for the clients. Otherwise, a hardcoded prefix of fddd:1194:1194:1194::/64 is configured.
- Depending on your selection, either the DNS servers of the machine are copied into the configuration file or the DNS servers of the selected provider or the DNS server of your choice.
- Only for UDP configurations the explicit exit notification gets activated.
- The firewall (iptables or firewalld, depending on the distro) gets configured to NAT the private traffic in the Internet. A hardcoded subnet of 10.8.0.0/24 and a hardcoded prefix of fddd:1194:1194:1194::/64 are used for that and made permanent by putting it into
/etc/systemd/system/openvpn-iptables.service(for iptables) or by marking the rules as permanent (for firewalld). - A new
openvpn-iptables.serviceis registered for systems with iptables. - A configuration file for the client is generated.
Coming Soon
- Creating a convenience method for starting and stopping the VM on AWS (using a Lambda Function).
- Generating the complete CA using OpenSSL directly.
- Creating a secured DNS server.
Fine Tuning
A few things were not configured the way we wanted it:
- Clients get a private IPv6 address.
- Server is not reachable via its IPv6 global address.
See below (IPv6 Routing) on how to determine the correct values for server-ipv6 <IPv6 network range>/<prefix size> and push "route-ipv6 <IPv6 network range>/64".
/etc/openvpn/server/server.conf
# comment it out, not necessary
# local <IPv4 address of your machine>

# choose a port OpenVPN will listen on (configured by the script)
port <OpenVPN's port>

# change to IPv6-able protocol (IPv4 will be included)
# udp6 or tcp6
proto udp6

# no changes in this block
dev tun
ca ca.crt
cert server.crt
key server.key
dh dh.pem
auth SHA512
tls-crypt tc.key
topology subnet

# private IPv4 network (must match iptables)
server 10.8.1.0 255.255.255.0

# public IPv6 network (:1 will take the server, :1000 and following for clients)
server-ipv6 <IPv6 network range>/<prefix size>

# push IPv6 routing configuration to the clients (see explanation below)
push "route-ipv6 <IPv6 network range>/64"

# add "ipv6" here: routes the whole IPv6 unicast space via VPN
# "def1" overrides the default gateway in a smart way without deleting the original one
# "bypass-dhcp" allows local DHCP, otherwise it would be redirected to the VPN as well
push "redirect-gateway def1 ipv6 bypass-dhcp"

# persistent IP addresses for the clients
ifconfig-pool-persist ipp.txt

# adapt DNS servers as needed - you need servers supporting IPv6 queries (AAAA)
# here as an example - Google ones
push "dhcp-option DNS 2001:4860:4860::8888"
push "dhcp-option DNS 2001:4860:4860::8844"
push "dhcp-option DNS 8.8.8.8"
push "dhcp-option DNS 8.8.4.4"

# uncomment to block DNS servers on other (than the tunnel) network adapters
# push "block-outside-dns"

# no changes
keepalive 10 120
cipher AES-256-CBC
user nobody
group nogroup
persist-key
persist-tun
verb 3
crl-verify crl.pem

# uncomment to optimize tunnel restart notifications
# explicit-exit-notify
/etc/systemd/system/openvpn-iptables.service
The installation script creates a new service persisting the iptables settings. Changes to the addressing schema do require changes here as well.
# IPv4
...
ExecStart=/usr/sbin/iptables -t nat -A POSTROUTING -s <private network> ! -d <private network> -j SNAT --to <public address>
ExecStart=/usr/sbin/iptables -I FORWARD -s <private network> -j ACCEPT
...
ExecStop=/usr/sbin/iptables -t nat -D POSTROUTING -s <private network> ! -d <private network> -j SNAT --to <public address>
ExecStop=/usr/sbin/iptables -D INPUT -p udp --dport <OpenVPN port> -j ACCEPT
...

# IPv6
...
ExecStart=/usr/sbin/ip6tables -t nat -A POSTROUTING -s fddd:1194:1194:1194::/64 ! -d fddd:1194:1194:1194::/64 -j SNAT --to <global address>
ExecStart=/usr/sbin/ip6tables -I FORWARD -s fddd:1194:1194:1194::/64 -j ACCEPT
...
ExecStop=/usr/sbin/ip6tables -t nat -D POSTROUTING -s fddd:1194:1194:1194::/64 ! -d fddd:1194:1194:1194::/64 -j SNAT --to <global address>
ExecStop=/usr/sbin/ip6tables -D FORWARD -s fddd:1194:1194:1194::/64 -j ACCEPT
...

# Reachability of the OpenVPN server
...
ExecStart=/usr/sbin/iptables -I INPUT -p udp --dport <OpenVPN port> -j ACCEPT
ExecStop=/usr/sbin/iptables -D FORWARD -s <private network> -j ACCEPT
...
IPv6 Routing
For the Tunneled Traffic
- The server machine needs a global IPv6 prefix that can be used by the OpenVPN (for the tunnel device and for clients). Depending on provider where the machine is running, you need to find a way to ensure all packets to this prefix are delivered to this particular machine.
- The server machine needs a unique global IPv6 address for itself if you simply want to provide private IPv6 addresses to your clients.
The prefixes must be chosen in the way, everyone knows where to send the packets to. One of the simplest cases would be:
Note: This example has been adapted to better reflect the actual situation on AWS.
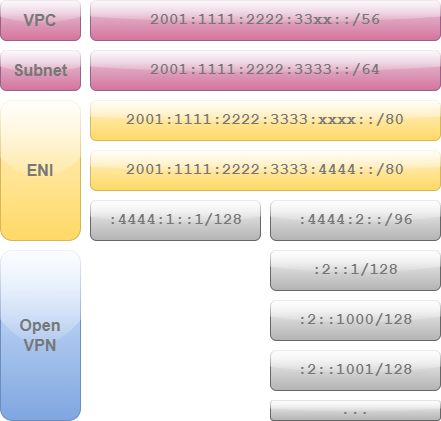
- You get a prefix from your provider, say 2001:1111:2222:3333::/64, which means the first 64 bits are fixed and the last 64 bits are freely selectable by you (the prefix size of 64 in this example can differ in your case). AWS limits the prefix size that can be assigned to a single machine to 80 bits. So you end up with 2001:1111:2222:3333:xxxx::/80 and you are free to choose the
xxxxvalue. For the example I take a4444. - You create two "subnetworks": one for your virtual machine and one for the OpenVPN, for example 2001:1111:2222:3333:4444:1::/96 and 2001:1111:2222:3333:4444:2::/96. Yes, it's a waste, but well: you still have like 32 bits per subnetwork, which is equal to the whole address space of IPv4. You could theoretically take just one bit more for the two subnetworks (2001:1111:2222:3333:4444::/81 and 2001:1111:2222:3333:4444:8000::/81), getting 47 bits per subnetwork, but there is no benefit of it.
- You may assign an address to the main network adapter from the first sub-prefix, e.g. 2001:1111:2222:3333:4444:1::1/128.
- You may assign the second sub-prefix to the OpenVPN
server-ipv6 2001:1111:2222:3333:4444:2::/96. The tunnel adapter will get the +1 address, so 2001:1111:2222:3333:4444:2::1 in this case. Clients will get addresses of +1000, +1001, +1002 and so on (2001:1111:2222:3333:4444:2::1000, 2001:1111:2222:3333:4444:2::1001, 2001:1111:2222:3333:4444:2::1002...). - Clients need to know anything outside of this prefix should be routed back to the server and this can be a little bit tricky. But let's come to this later.
All these settings must be reflected in the iptables (or firewalld) settings. The installation script assumes you want to get a private network. If you switch to global addresses as described above, you should remove NATting for IPv6 completely.
At this point you should get global IPv6 assigned to your clients and be able to access the IPv6-based Internet. Surprisingly you will not be able to ping the main network adapter of the virtual machine. Let's take a look at the routing table on a client (Windows):
1 2 3 4 5 6 7 8 9 10 11 12 13 14 15 16 17 18 19 20 21 22 23 24 25 26 27 28 29 | |
The interface No. 25 is the one that we should look at.
- Line 14 redirects "all other" traffic (::/1) to the gateway (our VPN server).
- Line 16 says that the whole 64-bit-prefix is reachable in the local network (no gateway needed).
- Line 17 says that our VPN neighbors (other VPN clients getting IP address of the same range as we do) are reachable via the gateway.
- Line 18 is our own address.
And exactly the line No. 16 is the problematic one. This route is not pushed by the OpenVPN server to the client. Instead, the client generates it automatically. Allegedly this practice is recommended in RFC 4291 and/or RFC 5375 and/or RFC 4193 (note to be verified).
You can't remotely remove this route. The solution is to tell the client that this range also needs to be reached via the OpenVPN server. You can achieve that by adding the line to the /etc/openvpn/server/server.conf:
push "route-ipv6 2001:1111:2222:3333::/64"
This option route-ipv6 takes up to 3 arguments: the destination, optionally a gateway and optionally a metrics. Leaving the gateway empty will automatically evaluate to our server.
For the OpenVPN Service
The last point is reachability of the OpenVPN server via its global IPv6 address as well. This is done by:
- Assigning the machine a global IPv6 address.
- Making OpenVPN to listen on the IPv6-socket (see above for udp6 and tcp6)
- And opening the firewall for incoming traffic here.
TODO: add info on sysctl net.ipv6.bindv6only
Packet Forwarding
Ensure that packet forwarding is turned on for both, IPv4:
/proc/sys/net/ipv4/ip_forward
The script makes it permanent in the file /etc/sysctl.d/99-openvpn-forward.conf.
and IPv6:
/proc/sys/net/ipv6/conf/all/forwarding
The script makes it permanent only if there was an IPv6 address available in the same file /etc/sysctl.d/99-openvpn-forward.conf.
Restart OpenVPN
The service can be restarted by systemctl restart openvpn.service, but a few things will stay outdated: the iptables and the configuration of the tunnel interface. A clean reboot may be a better choice.
Client Configuration
The client may need IPv6 to be turned on in the advanced settings.
Amazon AWS

You will need an EC2 instance (which is a simple virtual machine). The t3.micro is eligible for the free tier (please read all conditions before assuming that it would be for free in your case). This tiny VM is in most cases absolutely powerful enough for acting as a simple VPN gateway. During the setup a few services will be created. Some settings can be configured ad-hoc, some others will need to be tuned later on:
- Virtual Private Cloud is your sandbox in the huge AWS cloud. The very basic setup begins here: assignment of a private IPv4 range and, if required, a global IPv6 range. Amazon provides you with /56 prefix IPv6 here.
- An Internet Gateway is a dummy entity that will be referenced each time you want to say "this goes into / comes from the Internet".
- Subnets are logical segments, to which actual machines will belong to. Both IPv4 and IPv6 ranges are representing a subset of this, what is available for your whole cloud.
- Subnets are referenced in Route Tables, where you decide (based on the address prefix) which and where each traffic will go. Here is the place, where the Internet Gateway is referenced for real.
- Network Access Control Lists reference Subnets and are the first of two places acting as a high-level firewall. Protocols, ports, address ranges can be configured here.
- Above entities play their roles for your Elastic Cloud Computing (EC2) setup, your virtual machine. It will created in one of the Security Groups.
- So will happen with the Elastic Network Interface (ENI), which can be assigned a number of IP addresses or IP prefix delegations. The number of the assignments is limited depending on the virtual machine type. It's good to know that the prefixes count as 1 IP address. Security Group is the second of the two places acting as a high-level firewall. The default instance is quite restrictive, so you need to tune it up.
If you wish to create a setup compatible with the above notes, you should:
- Request an IPv6 address block from Amazon.
- Assign one IPv6 global address to the network card (remember the splitting into two subnetworks: one for the machine and one for OpenVPN).
- Assign one IPv6 prefix delegation to the network card (the one for OpenVPN).
- Possibly reserve a fixed public IPv4 (Elastic IP Address) as otherwise you get a random IPv4 address each time the VM is stopped and then started again. The IP address reservation costs money if the VM is not running (no money save).
Next: Understanding the internal design of a TK-905-4G